Monday 28 July 2008

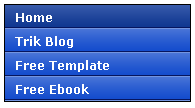
Sebelumnya kita pernah membahas tentang membuat menu horizontal, nha sekarang mari kita mencoba membuat menu vertikal. Menu vertikal ini cocok kalau dipasang di sidebar karena bentuknya berjajar sevara vertikal (ya iyalah). Contohnya seperti gambar disamping itu. Beginilah cara membuatnya :

1. Login ke blogger trus pilih "Layout-->Edit HTML"
2. Masukkan kode berikut sebelum kode ]]></b:skin> atau sebelum kode </style> . Pokoknya ditaruh di dalam Barisan kode CSS deh.

.glossymenu, .glossymenu li ul{
list-style-type: none;
margin: 0;
padding: 0;
width: 185px; /*WIDTH OF MAIN MENU ITEMS*/
border: 1px solid black;
}
.glossymenu li{
position: relative;
}
.glossymenu li a{
background: white url('http://kendhin.890m.com/blog/vertical/blue1.gif') repeat-x bottom left;
font: bold 12px Verdana, Helvetica, sans-serif;
color: white;
display: block;
width: auto;
padding: 5px 0;
padding-left: 10px;
text-decoration: none;
}
.glossymenu li ul{
position: absolute;
width: 190px;
left: 0;
top: 0;
display: none;
}
.glossymenu li ul li{
float: left;
}
.glossymenu li ul a{
width: 180px;
}
.glossymenu li a:visited, .glossymenu li a:active{
color: white;
}
.glossymenu li a:hover{
background-image: url('http://kendhin.890m.com/blog/vertical/blue2.gif');
}

* html .glossymenu li { float: left; height: 1%; }
* html .glossymenu li a { height: 1%; }


Untuk memilih warna menu, perhatikan kode2 yang berwarna merah (blue1.gif dan blue2.gif). Ganti kode tersebut dengan pilihan warna dibawah ini. Misal jika kamu ingin memilih menu warna merah maka kodenya menjadi seperti ini :

.glossymenu li a{
background: white url('http://kendhin.890m.com/blog/vertical/red1.gif') repeat-x bottom left;


dan

.glossymenu li a:hover{
background-image: url('http://kendhin.890m.com/blog/vertical/red1.gif');


Pilihan Warna menu vertikal :

blue1.gif

blue2.gif

green1.gif

green2.gif

red1.gif

red2.gif

pink1.gif

pink2.gif

black1.gif

black2.gif


3. Kemudian di save.
4. Lalu pergi ke menu "Page Elements"
5. Pilih "Add a Gadget -->HTML/JavaScript" kemudian masukkan kode berikut kedalamnya:

<ul id="verticalmenu" class="glossymenu">
<li><a href="/">Home</a></li>
<li><a href="http://trik-tips.blogspot.com">Trik Blog</a></li>
<li><a href="http://x-template.blogspot.com" >Free Template</a></li>
<li><a href="http://getebook.co.cc">Free Ebook</a></li>
</li>
</ul>


Kode yang berwarna merah adalah linknya dan yg warna biru adalah teks yang ditampilkan. Kalau mau menambahkan menu tingal buat lagi kode seperti yg berkedip2 dibawahnya.

Dah gitu aja. Gampang kan???? :D

Wednesday 23 July 2008

Karena sering ditanya tentang bagaimana caranya membuat Tab VIew (Biasanya nanyanya gini: "Mas cara membuat menu yg kayak punya mas gmn? yg ada "Tips & Trik", "Lain-lain", "Terbaru", "Komentar" itu lho). Ya kan? hayo ngaku... Tabview itu sangat berguna sekali, karena dengan ukuran kotak yang relatif kecil tapi bisa memuat isi yang buanyak. Sebenarnya dah dari dulu pingin posting tentang itu, tp karena yg dulu cara pasanganya sulit jadi belum bisa aku jelaskan. Trus akhirnya aku menemukan metode baru dalam pembuatannya. Cara yang ini mungkin mirip dengan punyanya o-om, tp scriptnya agak beda. Dan aku dapet script ini juga bukan dari o-om lho :D
Tab view itu contohnya seperti ini :


Beginilah cara untuk membuat menu tab view tersebut

1. Login ke blogger trus pilih menu "Layout --> Edit HTML"
2. Kemudian cari kode ini ]]></b:skin>
3. Kemudian masukkan kode berikut ini sebelum kode ]]></b:skin> atau kedalam tag CSS.

div.TabView div.Tabs
{
height: 24px;
overflow: hidden;
}
div.TabView div.Tabs a
{
float: left;
display: block;
width: 90px; /* Lebar Menu Utama Atas */ text-align: center;
height: 24px; /* Tinggi Menu Utama Atas */
padding-top: 3px;
vertical-align: middle;
border: 1px solid #000; /* Warna border Menu Atas */
border-bottom-width: 0;
text-decoration: none;
font-family: "Times New Roman", Serif; /* Font Menu Utama Atas */
font-weight: 900;
color: #000; /* Warna Font Menu Utama Atas */
}
div.TabView div.Tabs a:hover, div.TabView div.Tabs a.Active
{
background-color: #FF9900; /* Warna background Menu Utama Atas */
}
div.TabView div.Pages
{
clear: both;
border: 1px solid #6E6E6E; /* Warna border Kotak Utama */
overflow: hidden;
background-color: #FF9900; /* Warna background Kotak Utama */
}
div.TabView div.Pages div.Page
{
height: 100%;
padding: 0px;
overflow: hidden;
}
div.TabView div.Pages div.Page div.Pad
{
padding: 3px 5px;
}


4. Perhatikan text-text yang berwarna merah, itu adalah keterangan untuk pengaturan Tab View. Ada ukuran warna dll. Untuk mengetahui kode2 warna silahkan lihat DISINI
5. Langkah selanjutnya yaitu pasang kode berikut ini sebelum kode </head>

<script src='http://kendhin.googlepages.com/tabview.js' type='text/javascript'/>


6. Kemudian "Di save"
7. Lalu pergi ke menu "Page Elements"
8. Trus PIlih "Add a Gadget" --> "HTML/Javascript" di tempat yg akan km letakkan Manu Tab View ini.
9. Inilah script yg harus kamu pasang :


<form action="tabview.html" method="get">
<div class="TabView" id="TabView">
<div class="Tabs" style="width: 350px;">
<a>Tab 1</a>
<a>Tab 2</a>
<a>Tab 3</a>

</div>
<div class="Pages" style="width: 350px; height: 250px;">

<div class="Page">
<div class="Pad">
Tab 1.1 <br />
Tab 1.2 <br />
Tab 1.3 <br />

</div>
</div>

<div class="Page">
<div class="Pad">
Tab 2.1 <br />
Tab 2.2 <br />
Tab 2.3 <br />

</div>
</div>

<div class="Page">
<div class="Pad">
Tab 3.1 <br />
Tab 3.2 <br />
Tab 3.3 <br />

</div>
</div>


</div>
</div>
</form>

<script type="text/javascript">
tabview_initialize('TabView');
</script>


Keterangan :
- Angka2 atau text yang berwarna biru (350px) adalah ukuran tinggi dan lebar tabview.
- Kode yang berwarna Hijau Adalah text yang di Menu utama (Menu Atas).
- Kode yang berwarna merah adalah isi dari tabvie tsb. Kamu bisa mengisinya dengan link, gambar, banner, script dll.
- Untuk menmbahkan jumlah menu maka perhatikanlah text yang berkedip2. tambahkan menu tersebut dibawahnya.

Sunday 20 July 2008

Rx Commission is an Affiliate program to guarantee your long term income. You will receive commission up to 40% of the initial order value, plus Full Commissions on future purchases, your potential to earn money is unlimited . Commission percentage is based on product type and sales volume. You will benefit from a full range of products at unbeatable price, as well as guaranteed weekly payouts, an established support and payment processing infrastructure, and world-class affiliate program management. Rx Affiliate have an extensive range of medication and many more products at 80% below retail price. No Hidden Fees whatsoever! Int'l Orders are Welcome! Genuine FDA Approved Meds; returning customers will receive an additional 10% discount on their order. No Minimum Order & No Membership or Subscription Fees!


Rx affiliate offer full customer service on all orders, attentive Rx affiliate program management, and some of the highest converting templates on the market. It also have a full range of quality products, ensuring the success of any potential Rx affiliate. Rx Affiliate all over the web have been reporting growing sales on a daily basis. Rx Commission program has a Uniquely Robust Logistics, Support & Payment Processing infrastructure, coupled with a proactive marketing and customer retention service package. Guaranteeing Long term income and On time Payments every time! with no dragging of the payments, and other inconveniences. It support many different payment methods, including Epassporte Rx Affiliate, wire transfers, and more. Your long-term income is guaranteed. With 40% commission and more guaranteed for the first two months of an affiliate's career, it would be your potential and promising you a constant residual income. for informative articles and pointers on how to get started making money with affiliate programs and implementing an affiliate strategy on your site go to Rx Affiliate Resources

Saturday 5 July 2008

This contest will not be determined by a draw like most contests. Luck will absolutely play no role here whatsoever as the top thee (3) contestants with the most number of points on July 10 (12:00am Jack's Time) will automatically go home with the price. Basically, what you have to do is collect all the points that you can get.

Prizes up for Grabs
  • 1st Place : $50 hard cash + 10,000 EntreCard Credits

  • 2nd Place : 1 month 125�125 Banner ad on Jackbook.com (On the sidebar) value $50 + 5,000 EntreCard Credits

  • 3rd Place : 5,000 EntreCard Credits


How to Earn Points

2 Points x The Blog's Pagerank ? Placing a blogroll link from your blog to www.JackBook.com. 1 Point for a Zero pagerank Blog

2 Points x The Blog's Pagerank ? Placing a blogroll link from your blog to RomeUy.com. 1 Point for Zero pagerank Blog

5 Points x The Blog's Pagerank ? 5 points for every blog post. Jackbook will not set a requirement for how many words your blog post should contain for as long as three (3) links be present on it and the links will be on a paragraph. (2 Points for Zero pagerank Blog)

Again, that is 5 points for every blog post. The more blogs you make with three links on it, the more points you get.

Jackbook will not count links from newly created blogs to avoid the creation of new blogs for the sole purpose of gaming this contest. Also reserve the right not to count links from blogs that do not qualify for the contest. Don't worry, if this will ever happen, jackbook will make sure to inform the contestant including the reason why they were not able to accept the entry so that he/she could take the links down ASAP.

Copied from Jackbook.com Contest